Friday, January 27, 2012

Orange Chicken

I am in love with Pinterest. It's been less than 3 weeks but I just love it. It's fun to see things other people create. Truly inspiring. I've made several recipes from there this week alone. Here is one of them. In my true fashion, I didn't just make the recipe as written, but added and tweaked it a little. A few of the ingredients I bought at Olivelle which is a local specialty food shop. Lucky for all of you, you can order online and they ship!

The recipe I made was orange chicken. I thought it was delicious. My oldest daughter and my husband thought it was too spicy. I could have turned up the spice a bit, but thought I kept it pretty mild. You decide what's right for your family. Here's what you need:

3-4 boneless, skinless chicken breasts cut into small chunks
1/3 cup flour
Blood Orange olive oil (or regular olive oil if you don't have the blood orange)
1/2 Tbsp salt
1 T series 7 balsamic vinegar (use the best you can find)
1/4 cup ketchup
1/4 cup brown sugar
6 oz orange juice concentrate
1/2 tsp crushed red pepper (optional and can be varied depending on desired spicyness)


In your crock pot, combine the salt, vinegar, ketchup, brown sugar, red pepper and orange juice. Mix until smooth.

Place the chicken chunks into the flour, coating well. Heat the olive oil in a large skillet. The original recipe just called for regular olive oil, but using the blood orange oil made the chicken amazing. It is worth it to get the blood orange. Seriously, go to the Olivelle website and get some! Put your chicken in the skillet and brown it. It doesn't have to be cooked all the way through because it's going in the crock pot, but you do want the outside browned. This will probably have to be done in 2 batches.


Put the browned chicken into the crock pot. Cook on low for 5-6 hours. Serve with rice. It was a great change to the teriyaki chicken my husband would eat daily. Simple. Delicious. I suppose I'll have to leave out the red pepper on the next go-around. Enjoy!

Thursday, January 26, 2012

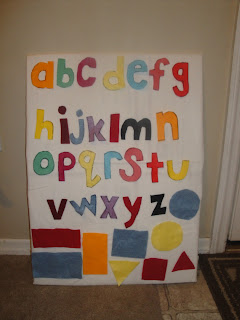
Felt Board

Anyone who knows me know that I'm a sucker for crafts and a sucker for learning. An educational craft is  the best of both worlds, especially when I have all the supplies at home. If you don't have the supplies, it's very inexpensive to buy them. The felt is usually 4 or 6 sheets for $1 at a craft store and you can pick up a piece of flannel fabric for about $2 (or less if you have a coupon!). You can buy a foam core board or just find some cardboard in your recycle bin (that's what I did). This is a great project that cost me less than an hour of time!

I had a bag of felt in various colors in my craft room. I drew each letter of the alphabet onto a piece of felt. I mixed up the colors for some fun. I also cut out some basic shapes (square, circle, triangle and rectangle).

Then, used an old flat rate box from the post office, and reinforced the bends with some cardboard just to keep it a little more rigid.

Cover the cardboard with a piece of flannel. Solid colors work best. I had white so my felt letters would show up.

You're all set! The felt sticks to the flannel board and you can use it for letter practice, building words, phonics, shapes, etc. My oldest daughter thinks it's a blast but the younger kids just like sticking the letters on the board. Have fun!

Wednesday, January 25, 2012

Kitchen Sink Pot Pie

You know the phrase "everything but the kitchen sink"? It describes the DELICIOUS dinner I made last night. Yesterday, I realized that I had spent all of our food budget for the month save $40 and there was a week left in the month. Problem #1: find delicious meals using what I already have in the house. I also HATE wasting food. Problem #2: I had several things in my refrigerator that I needed to use before it went bad. Problem #3: My husband bought Bisquick. He wanted to do the grocery shopping one week. I let him. I sent him with a specific list including Krusteaz pancake mix and he comes home with Bisquick. Now I have to use it up. The solution to these problems? Make a pot pie. It has been a long time since I made a pot pie. But I had meat and veggies that needed to be used. It was simple. I could prep it and have it ready to cook since Tuesdays are a busy day and I need to get our meal ready before I take my daughter to dance class. And it was so tasty! There weren't any leftovers.

Here's how I made it:
Meat: I had about a cup of steak that was already cubed into small pieces left from my pasties
Veggies: I had green beans, edamame and baby carrots in my fridge
Soup: 1 can cream of potato and 1 can cheddar cheese
1/2 cup milk
salt and pepper to taste
1 cup Bisquick
1 egg
1/3 cup milk


Brown and cook the meat.


 Add veggies. I boiled the carrots for awhile to soften them, then diced and added.

Pour in soups, milk and salt and pepper. I didn't add any salt because the condensed soups already have it in there, but a little pepper was good. Pour into an 8x8 baking dish. Mix up the bisquick, egg and milk. Pour over the meat and veggie mix.


Bake at 350 for 40 minutes or until golden brown.


I forgot to take a picture before we dug into the pie. It didn't last long at all. SO delicious. And solved the "problems" I had for dinner. The great thing about this recipe is there's no right or wrong way to do it. Have chicken? Use chicken and cream of chicken soup. Use whatever veggies you have on hand. I do recommend the can of cheese soup because it made it so savory. I had mine all ready and in the fridge so we could pop it in the oven when we got home from dance class.

I have several posts ready on new recipes I've done around here. Hope you're ready!

Tuesday, January 24, 2012

Valentine's Kids Crafts

Is it really the end of January already? I can't believe it. We've had the most out-of-character (but amazing) weather this year. Usually January is sub-zero cold and snowy, but we've had heat waves this year. Last week a huge storm dropped record amounts of snow all around us, but somehow missed our valley. We had 45-50 degree weather instead. I suppose that's why it doesn't seem possible for Valentine's day to be here. Today at Target, we had to buy Valentine's for my daughter to take to preschool. I wanted to make something creative, but she was stuck on buying Disney Princess valentines (for the second year in a row). I like making Valentine's crafts with the kids. Basically, anything with a heart on it qualifies.


Here is a simple Valentine's wreath. Just use different colored paper and cut various sizes of hearts out of them. I used a piece of chipboard and cut out a ring the size of the chipboard. I suppose you could cut out a heart shape to REALLY show your Valentine spirit. That will be my next one. Get out the glue stick and let the kids glue the hearts on the chipboard covering all the brown. String some yarn through the wreath to hang it and you're done! Simple, right? If your kids are older, you could even have them cut the hearts. My kids are little and my oldest is just starting to use scissors. She'd probably love to cut out the hearts, but it would take days to just get the cutting done.


Here is another easy Valentine's craft. The great thing about this project is it is spring-y too, so you can leave it up beyond Valentine's day. You need a toilet paper roll, some construction paper, pipe cleaners, hole punch, googly eyes (optional), glue and some markers or crayons. First, cut out a strip of paper that wraps around the cardboard roll and 2 hearts (same size) for the wings. Let the kids decorate and color these as they choose. Wrap the rectangle around the cardboard roll and glue. Then, glue the wings to the back. If you want googly eyes, you can glue them onto the roll as well. Take the hole punch and punch 2 holes on the upper back of the roll. Thread the pipe cleaners through the holes and curl at the top for antenna. Cute and easy!

A friend and I started a crafting club for local folks interested in making a new project every month. I'm hosting the first meeting in February and we're going to be making a Valentine's candle. Stay tuned for pictures!!

Monday, January 16, 2012

Let's Organize!

Face it. We all have those rooms in our house that are a disaster. It's usually one that you can close the door and no one is the wiser. For me, it was our laundry room. It's not even a real room (sadly). It's a closet that has to serve as our laundry space as well as linen storage. My challenges with this space are:
1. It's not a room, so there's limited space
2. It has to have all the laundry "stuff"
3. It has to have all the linens (or so I thought)
4. It also houses our broom, mop and dustpan
5. We keep a hammer, screwdriver, nails/screw box, flashlight there for easy retrieval
6. My diaper pail lives there
7. We have 4 different sized beds in our house with multiple sets of sheets for each bed
8. I needed space for tablecloths and shower curtains as well


Here is my picture of the before laundry room. See? A mess. I was throwing sheets and trying to get them on the top of the pile without toppling the pile. Our beach/holiday towels were out of reach. I really hated trying to put things away in there, but didn't know of a better solution. UNTIL.....I saw a pin on pinterest about folding sheets into their coordinating pillowcase. It was something I could easily do and would actually make a difference in that space. But why stop there? If I was organizing part of the laundry area, I would do it all.

I started with the folding of the sheets into their pillowcases. I used this a chance to weed through some of our sheet sets. Did we need 3 sets of sheets for our guest bed that gets used less than 7 nights a year? Did we need a velvet curtain that didn't fit any of our windows? Buh-bye extra linens (hello, Freecycle). BAM! 2 nice piles of linens that aren't towering and teetering out of control. Then, I cut up a shoe box and folded the cleaning rags into it, labeled it and put them neatly back on the shelf. I folded the towels and put most of them neatly on the shelf. I also took one set and moved it to the downstairs bathroom. We have a second bathroom, but no linens down there. This would save a step for the future. (It also creates a new organization project for me. Sigh. It never ends.) I cut up another box (recycle and reuse!) to store all the laundry supplies like my spray starch, spot remover, my spot scrubbing toothbrush, etc. Now it is compact and neat on the shelf. I moved the extra tools and hardware into my husband's tool box in the garage and just kept a hammer, our universal screwdriver and a pair of pliers. These are handy to have in the house, so I wanted to keep space for them. I have to admit, the shelving looked great, but I still had to deal with my diaper pail and the soak basin that usually sit on top of the dryer.

I slid both the washer and dryer over about 2 inches so I had a little more space on the left side of the closet. I hung the dust pan on the wall and was able to slide the mop and broom neatly behind the garbage can. Now I had space for my diaper pail on the floor of the closet next to the dryer instead of on the top! I can easily reach it, but it's not right in the way. I stacked the hand towels into one stack and the washcloths in front of them so I had room to place the basin on the shelf. This may have to change as the hand towels don't always stay so neat, but we'll try it out. Voila! The laundry closet is organized, neat, tidy and I feel accomplished. It gives me motivation to keep organizing throughout the house. (I started last night by organizing my sewing room.) Here are the after pictures. As an aside note, I was feeling down with my blog photos after spending so much time on Pinterest. The rooms, the foods, the crafts look like they're shot by a professional photographer. I wish my pictures were as visually pleasing, but I live in the real world and don't always have time to stage a shoot and my house is a regular house without any fancy built in laundry space with custom cabinets. It works for us. :)


Friday, January 13, 2012

Paper Kids

Sometimes it's the easiest projects that are the most fun. I picked up a roll of paper at IKEA for the kids. It's designed to go on an easel but I just tear off pieces as needed. Today I rolled out a LONG piece and had each of the kids lay down on the paper. I traced each of their bodies on the paper and gave them the markers. They had a ball scribbling on their paper selves. My oldest wanted me to draw Hello Kitty on her paper self so it matched the shirt she was wearing. Don't criticize my artistic skills (or lack therof). :) Even the youngest had a ball crawling on the paper and picking up stray markers. Just goes to show that good ol' fashioned paper and markers are still a great activity for kids!


Monday, January 9, 2012

Chicken Tortilla Soup

This is on our dinner menu tonight. Yum! The aroma in my house right now is just delicious. I know there are likely hundreds of variations of chicken tortilla soup. I like this particular recipe because it has ingredients that I usually have in my house, it is (almost) a dump and sit type crock pot recipe and it makes a huge batch so I can freeze half for a second meal. My sister-in-law Lori gave me this cookbook a couple years back. It is one of those compliation cookbooks where everyone gives their favorite/best recipes and then they're sold for a fund raiser. There are some great recipes in there. I'm sure I'll be sharing a few, but I told you why this one works for us. Here is what you need:


1 can black beans (drained and rinsed)
1 can pinto beans (drained and rinsed)
1 can kidney beans (drained and rinsed)
1 can tomato sauce
2 cans chicken broth
1 can enchilada sauce
1 tsp chili powder
1 Tbsp cumin
1 clove garlic (not pictured)
1 can/package corn
2 c cooked, shredded chicken (4-5 breasts)

The reason I say this is almost a dump and sit recipe is because of the chicken. I prefer to use boneless skinless chicken breasts, so you do have to cook it and shred it before adding to the crock pot. If you're in a pinch, you can use canned chicken, but I think it's so salty I don't use it. Anyway, get your chicken on the stove to cook and start adding the rest of the ingredients to your crock pot. Any order, just dump them in. Turn on low and let simmer for 5-6 hours. If you see in my picture, I actually used cannelinni beans instead of black beans this time because I didn't have any black beans (weird for me). I'm a big fan of "cook with what you got." I've had some darn good meals when I've been creative with what's in my pantry. Serve the soup with cheese, sour cream, tortilla chips and (my favorite) avocado. It's also really good with corn bread on the side. It makes a ton, so you can easily freeze some for another meal. An easy meal for the first prep and a freezer meal?? You're welcome. :)

Tuesday, January 3, 2012

New Year Reflections


Are you tired of hearing about New Year's stuff yet?? I thought I'd take today's post and share with you some reflections of 2011. I am a firm believer in learning from things I've done, both successfully and with epic failure and everything in between, learning from experiences, learning from others and mindfully trying to make my and my family's life better.

2011 was a year of firsts. Many of these were because my youngest was old enough to "do" things so we got to "do" family things. Here's my list of firsts:

1st family vacation/plane trip (Hello Wisconsin!)
1st family waterpark visit
1st family camping trip
1st time staying in forest service cabin w/ family
1st time I haven't spent part of the year pregnant (since 2006!)
1st time leaving husband and children for a mom-only vacation (Hello St. Louis/Chicago!)
1st full year of being self-employed
1st boudoir photo shoot (ooh la la!)
1st time playing Bunco
1st burlesque class
1st show with my Carlia Creations business
1st time using cloth diapers
1st time choosing to wean my child
1st time back in size 7/8 (since 2005!)
1st camper I've ever owned (thanks Baxley's!)
1st time seeing friends in 4 years, 8 years or even 12 years
1st time not seeing my brother and his family all year :(
1st time hiring an attorney
1st time couponing for real
1st time making money b/c of coupons (yippee!)
1st time using fondant for cake decorating (love it!)
1st time being hired to bake/decorate cakes
1st time sending my child to (pre)school

We were blessed with a year of health and happiness. My husband had a good year with his business and was fortunate to find work in the off season. I'm so proud of him for building the curbing business and doing the right thing when it came to helping homeowners who had problems from the previous owners' errors. I love that he can barter his trade work with folks who also have their own businesses. Although this may be the leanest year financially for us, we are rich with love and family. We don't live glamorously, but we have all we need. I am SO LUCKY to be able to spend the day with my kids and share our home with other children. We are surrounded by large supportive and loving families and wonderful friends with growing families of their own. Nikki has become such a family dog and lover of children, despite the pouting she did when we first brought our oldest home from the hospital.

I don't generally make New Year's resolutions as I try to be a changing and evolving being. I try to better myself throughout the year and things that may be important in January may not be as important in June. I have set some goals for myself and my family this year. Some may come easy, some will take work. I hope all of you have ideas for yourselves to make your lives better. I encourage you to look at last year and think of 2 things you did well that you'd like to continue doing and things you failed at that you want to learn from and do better. I know I ask my readers to do things from time to time, but I want everyone to live up to their fullest potential. It's in all of us! Happy New Year to all! Cheers to a GREAT 2012!!