Sunday, October 23, 2011

German Pancakes

I love breakfast and breakfast foods. From cereal to eggs to waffles, it's all good with me. Like most moms, I like a recipe that is tasty, nutritious, and quick. This recipe is all of those things. It's quick to prepare and then you can get it baking while you get the kids up. Here's what you need:

2 T butter
3 eggs
3/4 c milk
3/4 c flour
2 t sugar
1 t nutmeg
For serving:
fresh sliced lemon or lemon juice
powdered sugar


Preheat your oven to 425. As it's preheating, put the butter in a glass baking dish (9"x9" square or 9" pie plate) or cast iron skillet. Our cast iron skillet is in our camper packed away for the winter so I used the pie plate. Put your baking dish/skillet into the oven to get HOT.

For the next step, you can use a blender or put in a bowl and use an immersion blender (my preference). Combine all ingredients and blend until well mixed. Once your baking dish/skillet is HOT, pour the egg mixture into the dish. Bake at 425 for 20-25 minutes or until fluffy and lightly browned. Let cool slightly before cutting. Serve with lemon (squeezed on top) and sprinkling of powdered sugar. You can also use maple syrup, but the lemon and sugar is so light you should definitely try it.

Friday, October 21, 2011

Korker Hair Bows

Being the mom of two girls, I get the pleasure of making all sorts of crafty things for them. Fortunately, they both like looking girly (even though they love playing in the mud and being dirty). My girls are a little challenged in the hair department. Meaning that they were both bald for a good part of their first year and they have a pretty high hairline until they turn 2. Luckily, there are crochet headbands in every color that I can dress up with fun clips. Here is a tutorial on how to make korker bow clips. I debated at first whether or not to post this tutorial since I do sell hair bows through my Carlia Creations business. However, there are several tutorials online on how to kork the ribbon, so if someone really wanted to make their own, the information is out there. I'm going to show you how to kork the ribbon and one way to make a bow. Use your creativity to design your own style.

What you need:
grosgrain ribbon (I prefer 3/8")
1/4" wooden dowel cut into 12" sections
clothespins
spray starch
scissors
For the Bow:
coordinating ribbon (any material)
rhinestones
alligator clip
yarn
glue gun

First, you will need to make the korked ribbon. Have your dowels cut into 12" sections. Starting at one end, clip the ribbon to the dowel. Be sure you buy grosgrain ribbon (it looks ribbed). Other ribbons can melt or burn. Wrap the ribbon around the length of the dowel. TIP: wrap as tightly as possible and push the ribbon tightly so you don't see any wood between each wrap of the ribbon. The ribbon will loosen up as soon as you take it off the dowel. When you reach the other end of the dowel, cut the ribbon and clothespin the end. Repeat using all the dowels. Each 12" length of korked ribbon will make 3-4 pieces finished ribbon for your bow (depending on child/bow size). A standard korker bow uses 20+ pieces of ribbon, so plan your colors accordingly.

After you have wrapped all the dowels, wet them thoroughly. Then spray each dowel (both sides) with spray starch. Place on a cookie sheet and put into oven. Turn oven to 300 degrees and set your timer for 30 minutes. The preheat time is included in this 30 minutes. When the timer goes off, take your cookie sheet out of the oven and let the ribbon cool completely. Once it has cooled, then remove the clips and carefully slide the ribbon off the dowel. It will now be korked!

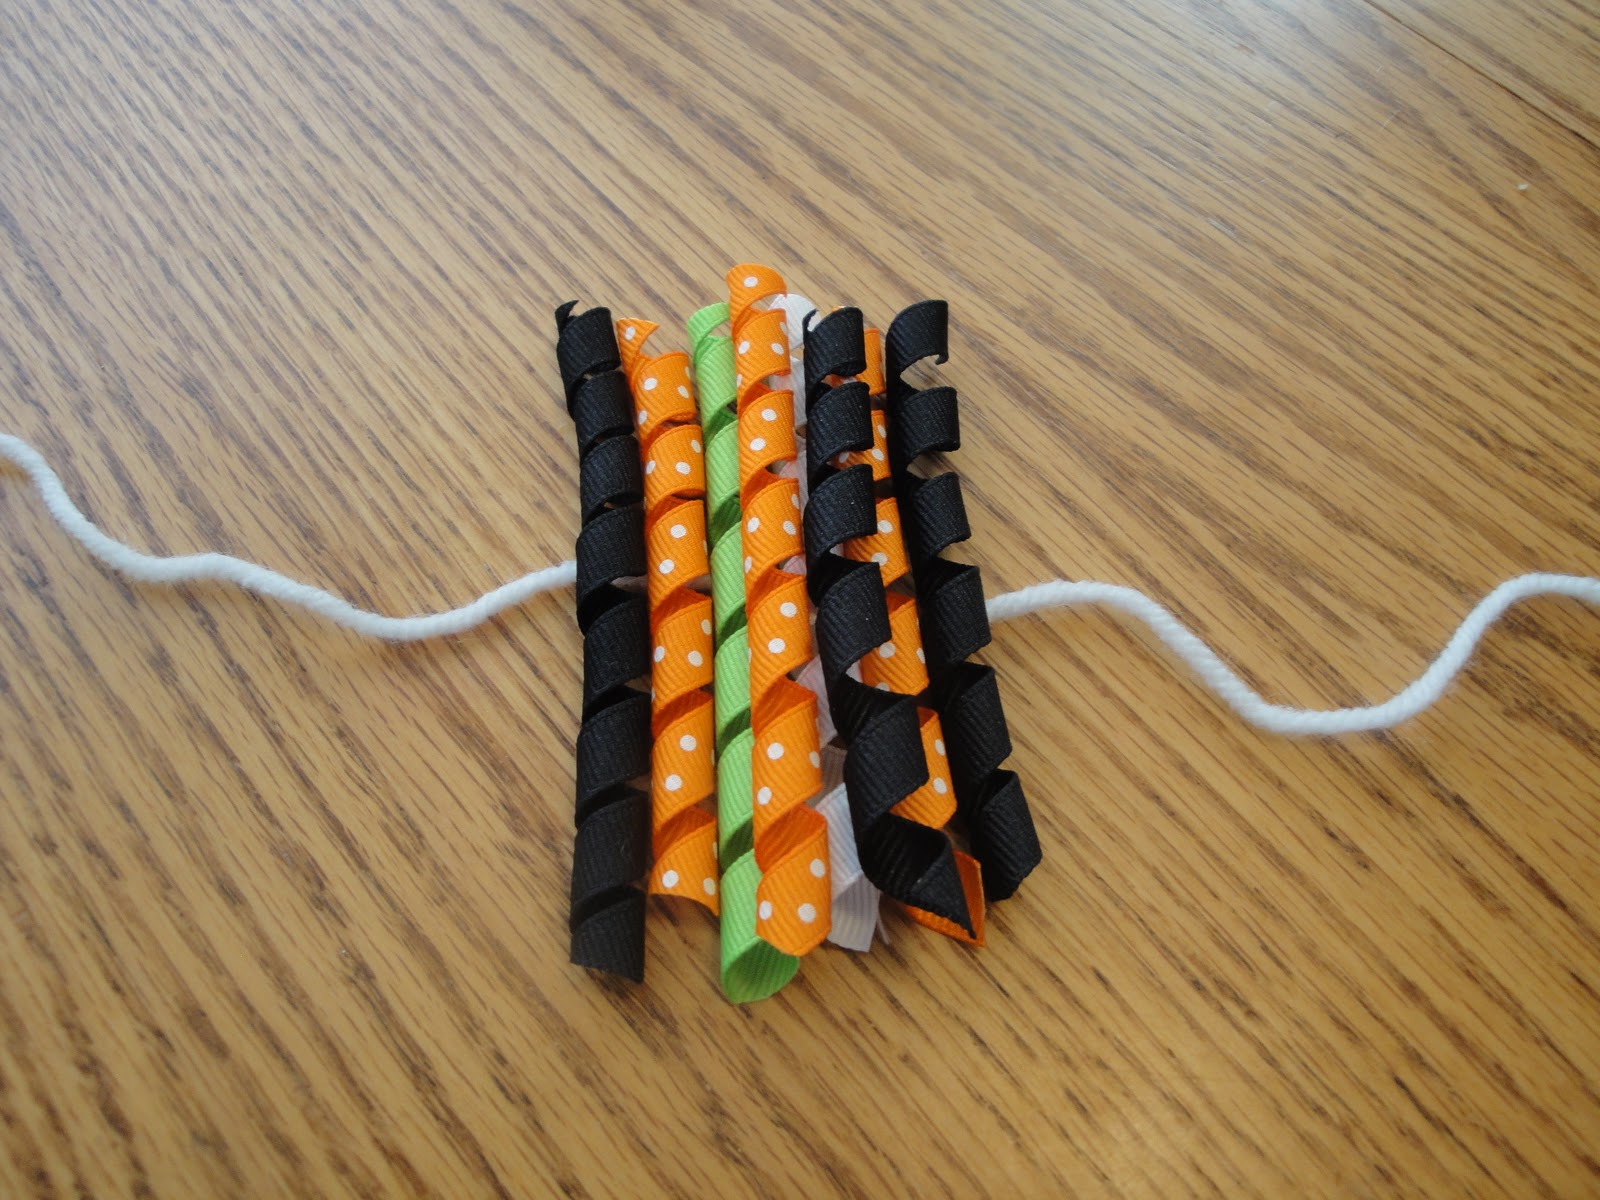
To make your bows, cut each piece of korked ribbon into 3 or 4 pieces. This really depends on the size of the bow you want. For young kids, I suggest pieces no longer than 3", but experiment and decide what is the size for your child. Lay out an 8" piece of yarn on a table. Then line up and stack the korked ribbon on top of the yarn taking care to center each piece left to right on the yarn. When I'm making a full korker bow, I use clothespins to keep the ribbon from sliding and it makes stacking easier. Once you have your ribbon stacked, grab the ends of the yarn and tie a knot over the ribbon making a pom pom. The more ribbon you use, the fuller the pom pom. In these pictures, I used fewer pieces because I'm going to add a satin ribbon as well. Trim the ends of the yarn and place a dot of hot glue on the knot.


This could be the end of the bow making if you want. I have been making some Halloween themed bows, so I tied a bow out of a satin jack-o-lantern ribbon and hot glued it to the korker bow. I also added a simple rhinestone to the center of the satin bow. Again, use your own creativity to make something great!

Lastly, hot glue an alligator clip to the back side of the bow. I like the alligator clips because they can be used directly on the hair or on a headband or you can even clip on a scarf or purse. This alligator clip is lined by the same grosgrain ribbon using hot glue. Voila! Instant bling!
Here are a few pictures of korker bows I've done. I've made just plain korker bows, added satin ribbon, rhinestones, or tulle. I have friends who make gorgeous elaborate bows, too. Hope you enjoyed this tutorial!

Wednesday, October 19, 2011

Salsa Chicken

When you're on a limited budget, like my family is, you have to get creative with basic (cheap) ingredients for dinners. PLUS, I need to make them healthy and nutritious for my growing children. I try to research recipes online, but I'm especially thankful when a friend recommends something tasty. Shout out to my friend Natalie for sharing this recipe. Like many of my crock pot recipes, I made a double batch so we could eat half and freeze half for a quick meal down the road. I do this quite a bit because it doesn't take any extra effort, but it can save us on a night where I have plans or if I simply don't feel like cooking. (Moms, you can relate right??) Here's what you need (single batch):

3 boneless, skinless chicken breasts (cut in half if they're large)
1 can cream of chicken soup
1 cup salsa or picante sauce
1 packet taco seasoning
1 cup corn
1 cup sour cream
cilantro (to taste)

In your slow cooker, add the soup and salsa and mix well. Add the chicken breasts then sprinkle the taco seasoning on top. Mix until seasoning is combined and all chicken is covered. Cook on low for 4-6 hours. Remove chicken. Add the corn and sour cream and mix well. Shred the chicken and add back into the slow cooker. Turn on high and let cook for 30 more minutes. Serve over rice with cilantro on top.

Results: my family liked this recipe. It's a good combination for a nearly one-pot rounded meal (protein, veggie, dairy, starch). Plus, I have the second meal in the freezer. All we'll have to do is make more rice. Chicken and rice are inexpensive staples in our house and I like serving them in a different way. Enjoy!!

Tuesday, October 18, 2011

Football: Not just for boys

I'm a football nut. NFL....good. College.....good. High school.....good. I'm playing in three fantasy football leagues this year, including one ladies only league of which I'm the commissioner. I married a football nut. We went to a Denver Broncos' game for our honeymoon. We have withdrawls in February after the NFL season ends. I wouldn't have it any other way. We've chosen to raise our girls with the football mentality. In fact, our birth announcements for our oldest had her in a Broncos' cheerleader outfit. My youngest went to her 1st football game when she was not even 5 months old.

This year, we've gone to almost all the MSU Bobcat football games at home (thanks to our friends and family who have given us tickets!!). We've always enjoyed them, but the new stadium is really spectacular. This past weekend, I got the chance to go to the game with just my oldest daughter. It was a special day to have some alone time. It was even more special because she's starting to show an interest in football, what is happening, the players, and the game itself. I loved teaching her about the plays and the rules in 3-year-old terms. AND she gets it. Of course the highlights for her are still Champ the Bobcat, the marching band and dancing to the fight song. But now she has a favorite player (#25 Cody Kirk) and she spends equal time watching the game as she does looking for the mascot. It dawned on me as we were sitting wrapped in a blanket in the (light) rain that I can enjoy football just as much with my girls as any parent might with their son. I know I enjoy the game more than most women and I can share that love with my girls. Teach them to love the sport, too. Football is not just for boys.


As a side note, many of my readers are MSU Bobcat or UM Grizzly fans. The big game is a month away. A friend's mom had designed a new product to help both teams show a little more spirit on game days. Team Tails are animal tails for each mascot that clip to your belt loops (or jacket zippers, purses, etc). My oldest was so excited to get her Bobcat tail at this week's game! Take a look at her site Team Tails to check out the tails and order one for yourself. She has the 2 Montana schools in adult and child sizes. Very cool idea and who doesn't want to support a local Montana business???

Monday, October 17, 2011

Colored Noodles

There are certain rites of passage for kids and crafts. First, they get crayons. Then it's markers and glue sticks. Followed by paint and good ol' school glue. When my oldest gets to use glue, she is so excited. I think she'd go around gluing all sorts of random things in our house if she could. She is also fascinated by the hot glue gun, but mom is mean and doesn't let her use it yet. :) Anyway, I have to find new things for her to glue because paper on paper gets boring (even to a 3-year-old) after awhile. My solution: colored pasta! It was so simple to make. I made a bunch of it and have it stored in baggies in our craft area so there's always something ready to be glued. Here's what you need:

small pasta (like macaroni or shells)
rubbing alcohol
liquid food coloring
small plastic food storage containers (1 per color)


 First put some pasta in each of your plastic bowls. I recommend filling about 1/3 full of pasta.
Then, fill each bowl with rubbing alcohol. You want some room in the bowl to be able to shake/mix the pasta, liquid and coloring, so don't fill it all the way! Just enough to cover the pasta.
 Next, drop liquid food coloring in each bowl. Some colors like blue and green don't take as much coloring as the yellow and red. I used about 10-15 drops of coloring per bowl because I wanted the colors to be nice and bright. Cover the bowls, give 'em a good shake to mix up and let it sit for 1-2 hours.
 Using a slotted spoon or a fork, get the pasta out of the liquid and dry on paper towels. I recommend paper towels over cloth towels because it will stain your fabrics. Let them dry. This will take several hours. You can add more pasta to your prepared liquids if you want more colored noodles.

The noodles glue very easily with white school glue to paper, chipboard, etc. I find for small fingers it works well to put some glue in a bowl or paper plate and let your little one hold the macaroni and dip it into the glue. It's a little easier than squeezing glue on each piece. Hope you have some fun!!


Friday, October 14, 2011

Brown Sugar Crock Pot Chicken

The older I get, the more I love fall. Fall in Montana means turning on the heat in the mornings and the air/fans in the afternoons. The smell of wet leaves on the ground is one that reminds me of being a kid (I have no idea why). As a matter of fact, the first time I visited Cornell was in October. The leaves were all changing colors and the Hilltop was truly magnificent. You couldn't deny how beautiful it was. It was less beautiful in sub-zero January, however.

The rite of passage every fall for me is the change in my meals. Let's face it, in the summer, it's hot and you certainly don't want to cook in the oven. We do lots of grilling and eat lots of fresh, cool salads. The last thing I want is something heavy sitting in my belly when I'm trying to stay cool and relax for the evening. Fall is a different story. Soups, stews and chilis are delighful. The warm deliciousness is comforting. Plus, I can add so many vegetables to them, it makes almost a one-pot full meal. I do a lot of crock pot cooking in the fall and winter as well, so I'm always looking for new recipes to try.

Yesterday, I was looking for something for dinner to use the chicken drumsticks I had in the freezer and came across the following recipe. My family are good sports about trying my new recipes (ok, they don't really have a choice). This one ROCKED!! It has all the elements of a great family meal: a few simple ingredients, E-A-S-Y to make, and delicious. Here's what you need:

10-12 chicken thighs or drumsticks or 6 chicken breasts, halved
1 cup brown sugar
1/4 cup lemon-lime soda (don't use diet)
2/3 cup vinegar (I used half apple cider and half white)
3 cloves smashed and chopped garlic
2 T soy sauce
1 t ground black pepper

Place your chicken in the crock pot. Cover with the brown sugar, garlic, pepper and soy sauce. Pour the vinegar over the top and then add the soda. It will bubble. Cook on high for 4-5 hours or low for 6-9 hours. The longer you cook it, the more tender it will be.

I made some au gratin potatoes to go with it (ok, so no veggies for this meal). It was very good. The girls gobbled it up as did my husband and I. One of the best new recipes I've tried in the crock pot in a while. Try it. You will love it. This goes on the permanent list.

If you're looking for more crock pot recipes, check out this blog. I've tried several (including this recipe) and haven't found a "bad" one yet.

Thursday, October 13, 2011

Accordian Bats

Halloween is my favorite holiday, hands down. I love the decorations and the creativity of the costumes. I have always loved Halloween, but never more so than when I had kids. Holidays become so much more special and magical when you live them through your kids' eyes. The smiles on my kids' faces when they dress in the costume of their choice that they've been waiting to wear for weeks only to walk around and get candy is priceless.

I love making Halloween crafts, too. Last year, I made these awesome paper mache pumpkins, skeletons with movable joints and scarecrows. This year, the average age of my day care kiddos is much lower, so I had to come up with some simpler crafts. The bats were inspired by my friend Mandy L. who made a super cute accordian cat. I thought I'd take the accordian idea and turn it into a bat. Here's what you need:
black construction paper
1 sheet of undressed chipboard
black marker (or black paint)
pipe cleaners
scissors
hole punch
circle template
 Take your circle template and trace lots of circles on the undressed chipboard. I chose chipboard because it is sturdier than plain paper. You will need something that won't tear easily because of the steps below. Cut out your circles.
 Color or paint your circles black. Of course, you don't have to use black, but my daughter thought basic black bats were good. Apparently, it's only spiders that should be pretty. Once the circles are colored (and dried if you paint them), punch 2 holes in the center of each circle so it looks like a giant button.
 Turning the construction paper so the long edge faces you, fold it into an accordian. Cut the pipe cleaners in half. Thread the pipe cleaner through the holes of the circle. The ends of the pipe cleaner should be on the back side of the circle. Pinch the middle of the paper accordian and place it on the circle with the pipe cleaner ends on each side of the pinch. Twist the pipe cleaner tightly so the accordian stays pinched. I also threaded the pipe cleaner ends back through the holes to the front of the circle so there weren't long ends. Finish with a twist.
 The finished bats! I'll likely hang them around the house and possibly outside in the trees using a little string.
 My camera hog daughter posing with one of her bats. You'll soon find out that my kids are anything but camera shy. I hope you enjoy this simple Halloween craft!