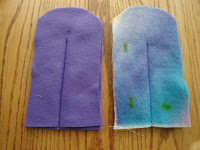
Make a pattern out of paper or newspaper. You will want to make a rectangle that is 8.5"x4.5". As you can tell by my picture, I chose to make the top rounded. I just used a bowl to make the rounded part. Remember, these are for cleaning, so you don't have to be perfect. I wanted to make mine as crisp as possible to demonstrate for you.
Cut out your pattern using 3 layers of fleece. Fleece won't fray or ravel, so it works great for washing and reusing the duster. The colors don't have to match. You don't even need matching thread.
Next mark your sewing lines on one of the pieces of fleece. You will want to draw a line down the center of the fleece at a length of about 5.5" from the bottom edge (non curved edge if you made it rounded). Then make a line .75" on either side of the center line also at a length of 5.5". Draw a line at the top connecting the three long lengths. This creates the pockets for your duster handle.
Stack your three pieces of fleece on top of each other. Sew down the center line through all three layers of fleece. This will hold your duster together. Be sure to reinforce the bottom edge with some back stitches since it will have stress on that seam. Then, fold the bottom layer back and sew down one side pocket line and across the top to the center seam. Only sew through the top two layers of fleece. Repeat for the other side.
With your scissors, cut fringe on your duster. You can cut different fringe for each of the three layers or you can cut through all three at the same time. I cut the 2 top layers (that make the center pockets) together and the bottom layer separately. It's up to you, but I would recommend cutting the third/bottom layer separately since you have a little more fleece you can fringe since there is no pocket on that layer. Ultimately, it doesn't matter.
Test it out! Insert the handle of the duster into the pockets and clean away! When it gets dirty, just pop into the wash, dry and reuse. Simple right??


I WISH I could sew! You rock!
ReplyDeleteThose are VERY cool!!! :) ~Mae
ReplyDelete