Wednesday, June 12, 2013

Baked Chicken Taquitos (Flautas)

Today's post is sharing a recipe that hits several criteria in my book. It's a tasty recipe to make up for the family. It's one that is easily doubled. It freezes well so you can make some for later. It makes GREAT leftovers. 

I originally found the baked chicken taquitos recipe on Pinterest. It comes from a blog called "Chef-In-Training." The recipe can be found here. If you follow it to the letter, it's a good recipe. It's easy to prepare in advance (read: during nap time) and simply cook when it's time to eat. I love that they're baked instead of fried like a traditional taquito. Speaking of which, are taquitos supposed to have corn shells? A quick wiki search just told me that a flour tortilla is actually a flauta. Good to know. 

If you've read many of my posts on recipes, you probably know I don't settle for a recipe "as-is." I'm constantly experimenting as well as utilizing what I have on hand. Here is my alteration of the recipe:

4 oz (half package) cream cheese softened
3 roasted green chiles, chopped
1/2 lime (squeezed for juice)
3/4 tsp cumin
1/2 tsp chili powder 
3/4 tsp onion flakes 
3 Tbsp chopped cilantro
2 cups shredded cooked chicken (more on this in a minute)
1 cup shredded mexican/fiesta cheese
about a dozen small tortillas (I use flour as they stay rolled better)
sea salt or kosher salt
cooking spray

The inspiration for some of my changes is because I received some gorgeous green chiles in my bountiful basket last week. I roasted all of them on the grill (hi heat, 4-5 minutes per side until charred, put in glass bowl covered with plastic wrap until cool, peel skin, de-seed and chop). I'm nuts over roasted peppers or chiles. The flavor is amazing. In addition to the roasted chiles, I had about 1 cup of seasoned shredded chicken in my freezer. It was left over from the last time I made chimichangas. The meat is so flavorful I thought it would be great in the taquitos/flautas. You can find the recipe to make this seasoned chicken here on "Mama To The Max." I only had half the amount of chicken I needed, so I added one large chicken breast's worth of shredded chicken to the mix. It wasn't seasoned, but there were enough other spices to make up for it. There are a few other tweaks I made to the recipe based on the flavors of the seasoned chicken (less onion, no garlic, more cumin, less chili powder). 

Basically you mix up all the ingredients, spoon about 2-3 Tbsp into a tortilla, and roll tightly. If you want to freeze and cook later, do it now. If you want to cook, spread on a cookie sheet so they're not touching, spray lightly with cooking spray and sprinkle with salt. Cook in 425 oven for 12-15 minutes. If you're baking from frozen, I've found a 375-400 oven for 20 minutes seems to work better. The basic recipe makes a dozen using the 8" tortilla size. I wouldn't recommend using larger tortillas. 

The roasted chiles and seasoned meat made this dish SO much better. I'm a flavor junkie, so this hit the spot. Plus there were extras for both my husband and I to eat for lunch today. Can't beat that!

Sorry, I don't have pictures, but you'll have to trust me on this one. Enjoy!!

Wednesday, May 29, 2013

Homemade Pizza Pockets

I'm always looking for a new idea for lunches for the kiddos. I'm good at branching out and trying new recipes for dinners, but it's much tougher for lunches. During the week, I feed my girls plus one or more day care kiddos. I want their lunches to be healthy (obviously) but I also want them to be fun, delicious, easy to eat.....perhaps I set the bar too high. Anyway, I thought I'd try a variation on homemade pizza.

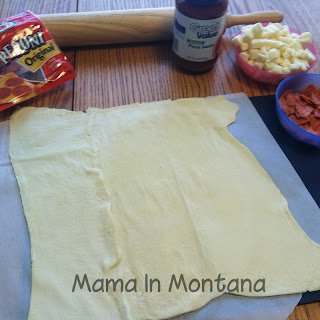
My kids (including the daycare kids) love making homemade pizza. Playing with dough, topping it on their own, the finished product is so much more fun to eat when you've made it yourself. I didn't get a chance to make up a batch of dough in my bread machine so I thought I would try some puff pastry dough. I had some in the freezer and figured it would make a good crust. I let it thaw, and then unfolded on a piece of parchment paper to prevent sticking. Once it was about room temperature, I rolled it out slightly with a rolling pin, then cut it into fourths. I cut some pepperoni into smaller pieces and cubed some real mozzarella cheese. Drop just a spoonful of pizza sauce in the middle of each square (not too much or it will make the pocket soggy), top with your favorite toppings, fold in half and seal with a fork. Bake at 375 for 10-13 minutes. Remove from oven and let cool before serving. I gave the kids a little pizza sauce for dipping their pockets. Voila! A fun lunch the kids helped prepare, plus much healthier than buying the frozen ones at the store. Kids loved them!! Enjoy!


Friday, May 24, 2013

Five Quick Camping Tips

Summer is for camping, at least for my family. Living out here in Montana, there are so many wonderful places to camp. My husband and I enjoyed tent camping before we had kids. We live in a place where there are bears, so we don't tent camp much since the kids have come along. Some good friends of ours gave us a 1969 Skamper tent trailer a few years ago and we've put it to good use. Here's a pic of our sweet set up from a few years ago. Not many people in 2013 camp with a 1969 camper and an 1988 suburban.


This weekend is Memorial Day. In more years than not, the weather is crappy over Memorial Day. Usually it's raining, sometimes snowing. The one year we had a big camp trip planned we got rained out the whole weekend. We stick close to home for the most part. This year, I happened to find out that a nearby campground has a tipi site people can reserve for camping. The campground is family friendly, it's about 30-40 minutes from home and is adjacent to one of the most popular state parks (Lewis and Clark Caverns). I reserved it for my family for one night (that's all that was available) and we're going to have an overnight adventure in the tipi.

Since we've been so lucky to have the tent trailer, most of our camping gear is stored inside it. It's been a long time since we car camped and I wanted to make sure we had everything we needed for the night. This mama entered list mode. As I've been working on my lists and packing up our Toyota, I thought I'd share with you 5 quick camping tips that make trips easier. These are helpful for the experienced or novice camper. You might know these or they night be new. Hopefully, you find it helpful.

1. Food. You're not going to be camping long without food. One of the things I do is make a list similar to my meal planning lists at home. I write down what we're eating for meals and tape it to a big tote. This way my family knows what is planned and what is available to eat.

2. Save space. Yes, I am one of "those" people who save condiment packs. I pop them in the drawer in my refrigerator. When camping time rolls around they're handy because I can pack less than a baggie full of condiments and save space in my cooler. Who wants to pack around full size bottles of condiments?


3. Save Space Even More. My kids have been out of baby food for years, but I still keep a few jars at home to use on occasion. The jar you see below has our coffee creamer in it. We've become snobs and drink only the italian sweet cream creamer in our coffee. Again, I don't want to bring the big bottle, so I put a little in my baby food jar to use for the morning cuppa joe.


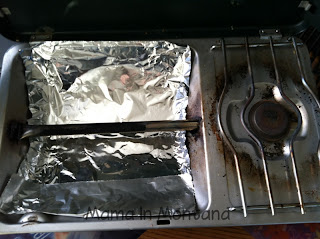
4. Clean Up Is A Breeze. We have a great Coleman camp stove. It has a regular burner with a separate part that is either a grill or a griddle depending on which part is place on the stove. The grill is very handy, but is a pain in the butt to clean. I just line the bottom with a little aluminum foil to catch any drippings. When we're done, we can wad it up and throw it away with minimal cleanup left.


5. Pack It In, Pack It Out. Lots of the campgrounds in Montana are fairly remote, plus there are countless other places to camp that aren't in an established campground. Because of these, we're always prepared to pack out whatever we brought, including trash. I saw a great tip on pinterest to fold up plastic grocery bags into little triangles (think the paper "footballs" from childhood). It allows me to pack quite a few bags in a small space so we have enough receptacles to remove all our trash.


You probably noticed many of my hints are reusing or repurposing items from around the home. It's a great way to get the kids thinking about how we can reuse items instead of throwing them directly in the trash.

We're looking forward to our overnight camp trip. It's sure to be an adventure we're remember for years! Happy camping!

Monday, May 20, 2013

Resist the drive thru! Homemade breakfast burritos

We all do it. Time runs short, we get up late, the kids are nuts/won't get dressed/are sleepy and we run out of time for a good home-cooked breakfast. You might scarf down a bowl of cereal. You might grab an apple or banana to eat on the go. Will you make it to lunch on that? What the heck? Just run through the drive thru at your local fast food joint or coffee hut. A good breakfast burrito costs $3-4 plus you're likely to get a beverage too. Those quick meals can add up fast. Here's a great alternative that will take less than an hour of time and save you some money too!

Here's what I use (you can change it up depending on what your preferences are):
1 dozen eggs
2/3 pound sausage
1 large green pepper
1 cup shredded cheese (I use fiesta blend)
8-10 large tortillas (more if you use medium size)

This is pretty easy, so I'm going to go fast. Ready? Brown sausage. Dice and cook pepper. Scramble all eggs. Mix in one big bowl. Boom. Done.


Put the egg/sausage mix in the middle of a tortilla, add cheese. Fold ends over center and roll up. Note: you might like salsa or hot sauce or sour cream on your breakfast burritos. Those ingredients don't freeze well. I recommend bringing them separately in a little reusable container.


I like to wrap each of my burritos in cling wrap. It helps protect them from freezer burn. You can also use aluminum foil (but don't use a microwave to reheat with foil!). I wrap each burrito and then place all the wrapped ones in a larger freezer zipper bag. Place in freezer. Tell your family these exist. No sense making them if your family doesn't know to grab them.


When it's a rushed morning, take one out of the freezer and pop in the microwave or toaster oven to warm. Easy peasy.

I took a little time to work out the cost of these things. Mostly because I'm a huge nerd and love figuring this out. Plus it helps me put a little pressure on the husband when he zips out of here and buys his breakfast. I use the big tortillas and fill them pretty full, so it makes 8 big burritos. I use farm fresh eggs and maple sausage which are a little more expensive, so your totals might be slightly less.

Tortillas               $1.16
Maple Sausage   $1.99
Eggs                   $3.00
Cheese               $1.01
Green Pepper     $0.50
TOTAL             $7.66 or $0.96 each


Thursday, May 16, 2013

Product Testing: Palmolive Soft Touch

I have some different kinds of posts for you folks out there in reader-land. Many of you know I'm a couponer. I follow several different blogs, have coupon friends, and co-moderate a coupon oriented facebook page. Part of my "research" is discovering different organizations that are hired for product research. I've participated in countless surveys and from time-to-time get chosen to try a particular product for review. I've tried everything from diapers to yogurt to coffee to household cleaners. Recently, I was selected through Influenster to try Palmolive Soft Touch.


Here's the rub: I'm pretty particular on my dishwashing detergents. I'm allergic to most of them. This is why I don't do a traditional hand washing of the dishes. I use one of those dish wand sponge things to minimize how much "stuff" I get on my hands. And don't suggest I wear gloves. All the household gloves are latex and I'm allergic to latex. I admit, I don't usually buy Palmolive. I buy another brand of dish soap. It works well, doesn't make me break out TOO much and I usually have coupons for it.


But, I'm a good product tester. I stripped off my wedding rings and made up a sinkful of suds to wash the lunch dishes. I'm going to give it the ultimate test: sensitive dry hands, dirty kid dishes, and some caked on pans from breakfast.

I was pleased with the cleaning ability of the Palmolive. The ketchup from the kids' dishes cleaned easily, as did the caked on egg residue from the skillet. I also washed my stoneware baker and it removed all food particles easily and quickly (so I didn't have to soak my stoneware!).

It's been several hours and I have no itching or blisters from the product. (Some hand soaps make me blister within 10 minutes). My hands actually feel as if I put on some lotion. After just one use, I still have dry hands, but I live in a dry climate. I'm interested to see how my hands feel after several uses. I'll keep you posted!

If you are interested in becoming a product tester, comment below! I will send you an invitation to become a member too.

Note: I was not paid to make these statements. I received these products complimentary from Influenster for testing purposes.

Monday, April 29, 2013

Memory Keeping for the Digital Age

How many of you keep a scrapbook for your kids? How about a box of stuff to save? Do you ever write things down to record later in a scrapbook or journal? I do all of those things. I really enjoy scrapbooking, but I have a hard time balancing all my hobbies at once. I've pretty much been slacking on scrapbooking for the past 5+ years. I still behave like I'm planning on making scrapbooks. Someday.


The idea I'm sharing isn't mine. I wish I could take credit for it. Actually, it was shared to me by my husband. I can't remember where he heard it. It might have been at the chiropractor's office. Regardless, it's a fun idea and a great way to keep all of the funny things kids say in one spot to share with them one day.

Set up an email address for your kids. If you have an ISP that gives you multiple email addresses with your internet service, use that. If you want to set up an address on one of the free sites, there's a little catch. You have to be 13 to sign up for the email. Since you are the one setting it up, it's technically your address so be sure to put your birthdate when establishing the account. If you try to enter your child's birthdate, you'll be kicked to a page about internet security and children. Trust me, I did it.

When your child has a spectacular moment, day, event, story, write an email to his/her email account. When you go to a well child check, email the height and weight to his/her email account. You can always send pictures too. Let the emails pile up. I would recommend logging into the account periodically to make sure it stays active. If you feel inclined, you can even create folders in the account by category so it's all organized.

The thought process is to provide your child with an email address and password when he/she hits a milestone. Perhaps it's graduating high school or turning 18. Maybe it's when he/she graduates college or boot camp. You might want to save it until your child has children of his/her own. Hopefully, it will be a fun trip down memory lane.

In our age of technology, it's easy to send a quick email by smartphone or draft something more lengthy at the computer. You can pass the email address to friends/family to add their thoughts as well. You decide the direction you want to take it. Make it fun. Make it memorable.

Thursday, April 25, 2013

Chicken Parmigiana (Chicken Parm for Short)

Sometimes you have a recipe that tastes good, make some tweaks to make it taste great. Today's recipe is one of those. I'm going to warn you up front, this is not a recipe for the calorie counters. This recipe is designed to be FULL OF FLAVOR, so there are some rich ingredients used. You can easily adjust it to cut some of the calories out. I'm going to give you the full flavor version. Take your pick.


The funny thing about chicken parm is that I thought it was short for chicken parmesan. But, there's no parmesan used, at least not in the recipes I've seen. After a quick google search, I found that we've Americanized the recipe from chicken parmigiana to chicken parmesan and there are some recipes that do use parmesan, but the PARMIGIANA is for the breaded cutlet with marinara. That's what I'm sharing today. My original recipe used the word parmesan without parmesan cheese. Weird.

You need:
Boneless Skinless Chicken Breasts (I use 3-4 big guys from Costco)
1 cup Bread crumbs (I like the italian seasoned ones)
2/3 cup French fried onions crushed
1-2 Egg(s)
1 quart Marinara sauce (I use my homemade stuff)
2-4 Tbsp Butter
2-4 Tbsp Olive Oil (I prefer the garlic olive oil)
1-1/2 cups Mozzerella cheese


First, cut the chicken breasts into smaller cutlets. Since I buy the big frozen bags at Costco, they're pretty big pieces of chicken. I cut them in half lengthwise and then in half again top to bottom. You'll want to make sure the cutlets are fairly thin. If you have a medium thickness breast, I'd pound it with a mallet until it's thinner than 1/2". One of the jumbo chicken breasts will make 4 good sized cutlets.


Crack an egg into a bowl and whip with a fork. In a second bowl, put about 1 cup of bread crumbs and 2/3 cup of crushed french fried onions. The french fried onions crumbs is a trick I learned from a friend and it adds so much flavor. Then dip each cutlet into the egg wash, then coat in bread crumbs. Set aside on a plate.


Heat 2 Tbsp of butter and 2 Tbsp of garlic olive oil in a large skillet over med heat. Once the butter is melted, add the breaded cutlets and cook until browned on each side. While they're cooking, pour a little marinara sauce in the bottom of a 9x13 baking dish and shake to coat the bottom. Place the browned cutlets into the pan in a single layer. Depending on the size of your skillet, you'll need to repeat this 2-3 times to cook the cutlets. Be sure to add more butter and oil before each browning.


Cover the browned cutlets with the marinara sauce. I use almost a quart of sauce for 1 pan of chicken parm. Sprinkle shredded mozzarella cheese over the entire pan. The pictures here show a cheese blend because that's what I had in the house. It's the end of the month, I'm out of mozzarella. Use what you have.


Bake in a 350 oven for 20 minutes to warm through and melt the cheese. You can also prepare ahead of time, refrigerate and bake when needed. I'd turn it down to 325 and bake a little longer if it's been refrigerated.

Enjoy! The flavors in this are amazing. It's a favorite in my house with my husband and my kids. I think my husband could eat it every week and be happy.

Friday, April 5, 2013

Update

Happy Friday to all. I don't know how many of you check my blog regularly (without being linked or finding through searches). Just letting you know that I have a 2 posts coming up (one recipe, one fun kids project), but I will be mostly taking a little break for a couple weeks. My youngest daughter's birthday is coming up and then I'm headed out of town for a special reunion weekend. These are both things I've been greatly anticipating, but will take me away from the computer. Hope you're having a great April! Keep checking in!

Tuesday, April 2, 2013

Cream cheese apple dessert

Recently, I bought a bushel of apples from Bountiful Baskets. They were delicious Fuji apples from Washington state. Crisp. Juicy. 40 pounds of apples is a lot of apples, so I made applesauce, homemade pie filling and apple chips. I don't make pies very often, but there are several recipes out there that use pie filling.


This particular recipe from Deep South Dish looked delicious. Crescent roll dough. Cream cheese. Apple filling. Cinnamon. Yum all over the place. It was easy to make. I took a picture of it once I put it in the oven. I found that pouring the butter on the top made some of the dough take longer to cook. I'd decrease the butter by half next time. The finished product wasn't nearly as pretty as the picture from the original poster, but it certainly was delicious.

Recipe courtesy of Deep South Dish
  • 4 ounces of cream cheese, softened
  • 1/2 cup of granulated sugar
  • 1/2 teaspoon of vanilla extract
  • 1 package of crescent rolls
  • 1 can of apple pie filling (I used about 3/4 of a quart)
  • 1/4 cup (1/2 stick) of unsalted butter, melted
  • Mixture of cinnamon and sugar

Preheat oven to 350 degrees. Spray an 8" x 8" baking pan with non-stick spray and set aside. Hand whip the cream cheese, sugar and vanilla extract together until well blended.

Unroll the package of crescent rolls and cut into even halves. Pinch together the seams and place one of the halves into the bottom of the baking pan. Spread the cream cheese evenly on top of the dough and top that with the apple pie filling. If you are using a low sugar or sugar free apple pie filling, you'll probably want to add some sugar or brown sugar to the apples. Top with the other half of the dough and pour the melted butter all over. Sprinkle generously with the cinnamon sugar.

Bake uncovered at 350 degrees for 30 minutes until golden brown. Let cool long enough to set the filling before cutting.

Cook's Notes: Using fresh apples? Just core, peel and slice and stew them down with a bit of butter for about 15-20 minutes until softened. Let cool slightly before assembling the dessert. This also makes a perfectly delicious dessert even without the fruit.

Friday, March 29, 2013

Savory baked sweet potato fries

I love sweet potato fries. Today I made some for lunch with a savory variation. I cut up one large sweet potato into thin sticks (about 3" long and 1/4" thick). Spread out on a large cookie sheet and drizzle with blood orange olive oil and sprinkle with seasoned salt. Bake at 325 for 35 minutes turning halfway through the time. Then broil for 6-8 more minutes to crisp the fries.

Holy cow these were tasty! Sure they take a little time to bake but worth every baking minute!! Give it a shot.


Wednesday, March 27, 2013

Roasted Asparagus with Balsamic Glaze

I learned a few weeks ago that it is asparagus season. I do love me some asparagus. Steamed. Grilled. Roasted. Love it all. We've been getting asparagus in our bountiful basket recently, too. It had been awhile since we'd had good fresh asparagus. My favorite way to eat asparagus is a recipe I've altered to be similar to an appetizer my husband and I ate on one of our anniversary dinners. Personally, I think my version is much better. Any time I've cooked it for friends, it's always a hit. Here's what you need:


1 bunch asparagus
2-3 T olive oil (get the good stuff, and if you can get garlic olive oil, it's even better)
1 clove garlic, minced
3-4 T finely grated parmesan cheese
Balsamic glaze for topping (see notes below)
grated parmesan for topping

Preheat oven to 375. In a large plastic bag (ziploc works well), put the olive oil and garlic. Wash the asparagus and break off the tough bottom ends. Pat dry and add to the plastic bag. Smoosh and shake to coat the asparagus with the oil/garlic. Open the bag and pour in the finely grated parmesan and shake again to coat. Spread the asparagus on a large cookie sheet and place in oven. Cook for 7-8 minutes, turn and cook for another 5-8 minutes depending on the girth of the asparagus. Remove from oven. Serve with a balsamic glaze drizzled over the top and with some freshly grated parmesan.

**Balsamic glaze is sold in many supermarkets in the vinegar section. It's usually in a plastic bottle that is sqeezable. You can also purchase at specialty food stores. You can make your own version by starting with a good quality balsamic vinegar and reducing it on the stove. It can take 30-40 minutes to reduce down. You must be careful to reduce over low heat because it is easily burned. When I make mine from scratch, I use 1 cup balsamic vinegar and 1 T brown sugar for a slight sweet tang. Bring to boil over medium heat and then turn to low. Stir frequently. It should reduce to about 1/4 cup. Store in the refrigerator.**

Hope you enjoy this asparagus side dish!  It's one of my favorites!!

Tuesday, March 26, 2013

Penne Gorgonzola

There's an Italian chain restaurant near us that holds a special place in my heart. My husband and I went there on our first date. Awwww. I'm one of those people that tends to order the same dish at a restaurant every time I visit. The recipe I'm sharing with you today is my version of Penne Gorgonzola inspired by this restaurant. The nice thing about this recipe is it can be made vegetarian or with chicken. I choose to use half and half instead of heavy cream since the flavor is almost the same but it has fewer calories. It's very adaptable to your personal tastes, too. If you like more garlic, add more garlic. Same with the gorgonzola. Or take out the gorgonzola and add parmesan for a more traditional alfredo sauce. So many possibilities folks. Here's what you need:

 
For the sauce:
2 T butter
2 T flour
2 cloves garlic, minced (not pictured)
1 cup half and half
2 cups broth (chicken or vegetable)
4-6 ounces gorgonzola cheese (or parmesan for milder flavor)
salt and pepper
 
For the remainder of the dish:
12-16 oz penne pasta (or pasta of your choice)
1 large chicken breast (optional)
sauteed mushrooms (optional)
diced tomatoes for topping
fresh parmesan for topping
 
In making the sauce, you're going to start by cooking the garlic in a small skillet. Just heat olive oil over medium heat, add the garlic and cook until softened. Set aside. In a med saucepan, add the butter and heat until melted. Add the flour and stir. You're making a roux. Continue stirring until the mixture is a light brown color. Using a whisk, slowly add the half and half. Stir until well combined and smooth. Add the garlic and broth and let simmer for the flavors to meld. Finish by adding the gorgonzola cheese and stir until melted and smooth. Season with salt and pepper to taste.
 
You'll pour this sauce over cooked penne pasta and diced chicken (if desired). The restaurant version also has sauteed mushrooms, but I'm the only one in my family who likes mushrooms, so I usually leave them out or serve on the side. Top with freshly diced tomatoes and grated parmesan.


This really is a comfort food dish. As I mentioned above, you can alter the recipe to your own preferences very easily. I hope you enjoy!!

Monday, March 25, 2013

Pickled Cauliflower

Today is a marinara making day. We're down to less than a quart left of marinara sauce, so I needed to get the next batch going. (My crock pot marinara recipe is here.) All my vegetables are from my bountiful basket, including the tomatoes I canned about a month ago. Smells delicious.


I'm pretty new to canning. This is not something my mom did when I was growing up. I know my grandma canned, but I pretty much have learned it all on my own the past couple years. You can see the fruits of my labor in the picture above. The beans were done by my mother-in-law. We haven't had much luck growing beans in our garden the past couple years. Pickling is a fun part of canning, too. My kids are good little vegetable eaters, but cauliflower isn't their favorite. I've tried the mock mashed potatoes, cauliflower hot "wings", and cauliflower au gratin but nothing really hit the spot. A local steak house has pickled cauliflower on their relish trays, so I thought I'd give that a shot. Holy cow!! My kids LOVE it. Seriously. They can eat an entire quart in one sitting if I let them. It's always a favorite around here (pretty much anything pickled will get eaten). I frequently get asked for my recipe, so here it goes:

1 head cauliflower
vinegar
sugar
salt
mustard seeds
black peppercorns
coriander
dill
onion
garlic
2 quart or 4 pint jars, cleaned and sterilized

I'm going to give you the measurements for pint jars. For quart jars, double all the measurements except the peppercorns.

Wash a fresh cauliflower. Remove any brown spots (cut them off). Cut into florets. Set aside.

Slice an onion. Cut into rings. Place 6 rings of various sizes into the bottom of your jars. Put 2 garlic cloves (sliced) in the jar as well. Add your dill. I used 3 sprigs per pint jar.

Fill your jar with cauliflower as full as you can make it. Then add 1/2 t mustard seeds, 1/4 t black peppercorns, 1/8 t ground coriander, 2 t pickling salt, 1 t sugar and 1/4 cup vinegar. Then fill the rest of the jar with water leaving about 1/2" head room.

Wipe the edge of the jar and place the lids on the jars. Tighten the lids on the jars to finger-tight. Place the jars in your water bath (still cold) and turn on med-low heat. If you don 't have a canner, use a large stock pot and place a tea towel or washcloth in the bottom before putting your jars in. Process the jars until it starts to boil. Let boil 5-10 minutes. I usually boil 10 since we're at a high altitude. Turn the heat off, cover the pot with a towel and let it sit until completely cooled. Remove from canner/pot and check the lids for sealing. If the lid pops in the center, it did not seal and you will need to keep it in the refrigerator. Allow the pickling to sit at least 1 week before eating.


I encourage you to give this recipe a try if you like anything pickled. The cauliflower stays crisp but has the delicious tang of pickling. You know it's good if my kids want to eat it for breakfast. Happy pickling!!

Friday, March 22, 2013

Big Bunny Craft

Easter is right around the corner. Already. This is the time of year that just speeds by for our family. We have something planned every weekend until May. It's nuts. Despite our busy schedule, the kids and I made a fun little bunny craft. These can be Easter bunnies for those of you who celebrate Easter or they can just be giant rabbits for fun. All it takes is some construction paper, scissors, glue sticks and some markers or crayons to decorate. This is an OLD project I remembered making in 5th grade art class. Some crafts are timeless.


The first thing you need to know how to do is fold your paper in half like a hot dog or a hamburger. A hot dog fold you put the long sides together and a hamburger you put the short sides together. Got it? You need 4 pieces of construciton paper. Piece one: fold like a hamburger and cut a wide heart. Piece two: fold like a hot dog and cut a long heart. Piece three: fold like a hot dog then fold like a hot dog again and cut a long heart (this will actually make 2 long hearts). Piece four: fold like a hamburger and tear in half along the fold line. With one half, fold like a hot dog, cut a long heart and then cut the heart in half along the fold. With the second half, fold like a hamburger, cut a wide heart then cut the heart in half along the fold.


You should now have 1 wide heart, 1 long heart, 2 skinny long hearts, 2 half skinny long hearts, 2 half short wide hearts.


Make your bunny. Notice the placement of each heart and glue it to the other parts as shown in the picture.


Decorate to your heart's content (pun intended). This is a simple craft that beginning cutters can do. Simply trace the heart and even preschool kids can cut out the pieces. It makes a bunny that is over 2 feet tall. If you want a smaller animal, just cut 2 pieces of construction paper in half and follow the directions using half sheets. Hoppy crafting!

Thursday, March 21, 2013

Reward/Consequence Jars

I'm back! I was really on a roll with my blog posts lately. Then my youngest daughter decided NOT to listen and ate her Reese's peanut butter egg in the living room and drooled chocolatey peanut buttery saliva all over our keyboard and shorted out the letters "K" "L" and the comma. Needless to say, I can't really post without using those letters and it's too tough to compose on my iphone. We ordered a new keyboard for the laptop and I installed it yesterday afternoon. Easy Peasy. Which leads me to today's post on a parenting idea.

Many of you know my kids are preschool aged. My oldest is 4-1/2 and my youngest is almost 3. They're smart girls and generally good kids. They have their moments, though. One of the difficult things for me as a parent is blatant disregard for instruction. You all know what I'm describing. You ask your child to pick up a toy. Child ignores you. You ask again. Child ignores again. You tell the child to pick it up. Child continues to ignore you. This continues until either A-you pick up the stupid toy yourself or B-you raise your voice, scold the child for not doing the task AND not listening, and perhaps administer a consequence meanwhile the toy is still sitting on the floor where it doesn't belong. I'm not the only one, right? My problem was this: I don't enjoy harping on my girls. I don't enjoy scolding them. I don't enjoy yelling at them. I became frustrated when they chose not to listen. I needed a behavior modification technique that would be understood by young children, could be used for positive or negative reinforcement, was easy enough that my husband would use as well, and taught the correct behavior I was trying to achieve.

My solution was a set of reward and consequence jars. First, because my kids are craft-crazy, we took some upcycled pizza sauce jars, made labels and mod-podged the labels on the jars. Each child had a jar and mom and dad had a jar to share. I cut the labels so they did not go all the way around the jar. I wanted to be able to see the contents from one side (more on this in a minute). I placed 50 pennies in each of the kids' jars and an assortment of pennies, nickels and dimes in mom and dad's jar. If your kids are older, pennies might not work as well, you may have to start with nickels or dimes or even quarters, but the concept is the same.


I used them like this: if the girls were asked to do something (clean their room, pick up toys, brush teeth, put clothes in laundry basket, etc) and did not do it, they were asked a second time (just to ensure it was not a hearing issue but a will issue) and still didn't do it, a coin was moved from their personal jar to mom and dad's jar. Being able to SEE the coin moved from jar to jar and seeing the coins pile up in mom and dad's jar instead of theirs is key. Everytime during the week the girls demonstrated an instance of not listening, a coin was removed. BUT if the girls did an extra chore, showed extra care or sharing, or had an above and beyond good attitude, they were rewarded by receiving a coin or coins in their jar. I try to reward with nickels and dimes and consequence with pennies. Again, seeing the coins move into their jar is key to reinforcing the behaviors. At the end of the week, the money left in each child's jar was removed and they could put it in their piggy bank. I would fill again with 50 pennies and the week starts over.

I had to explain the jars to the kids when we started and at the end of the week when we counted the money. I also made sure to explain the jars when I took coins out during that first week. I wanted my child to see me remove or replace the money in her jar. The first week was difficult, too. My girls had coins removed every day. I quickly saw some behavioral changes as well. Now, I can say, "Do you want to lose money?" or "I'm going to take money from your jar." and they know to change behaviors and/or follow directions.

The unintended consequence of this method has been the kids asking if a certain chore will get them money. I believe there are some chores which should be done regularly, without pay, because you're part of a family and that means working together to maintain the home. My oldest tries to get "paid" for some of these types of chores. I use it as a learning exercise to show that mom or dad doesn't get paid to clean or do laundry but it still has to be done. It's a small consequence I will accept in return for the better behavior.

I've been pleased at the results I've seen with the girls. I feel it's helped me be a better parent because the situations don't escalate. The jars hold both positive and negative behaviors and are easily administered. My husband follows through as well. We don't do allowances, so this lets the girls earn money for saving. It's also a learning activity too! My youngest can learn counting out objects and sorting (I usually ask for piles of 5) and then we can count by 5s as well. My oldest is learning about coin values so she understands 1 dime = 2 nickels = 10 pennies. Both girls love counting their money at the end of the week.

I hope this gives you ideas on alternative techniques to change the behaviors in your own homes. Let me know what you're doing, what is successful for you and your kids, what you've tried that wasn't successful. We have to learn from each other!!

Friday, March 15, 2013

Tom Kha Gai

Tom kha gai is a delicious, creamy Thai soup. I first had it at a soup cookoff at my previous job. I'm still new to Thai cuisine since my family ate pretty American growing up. I've come to love Thai food, but my husband and kids can take it or leave it. At least they humor me and try it when I make it. Bountiful Baskets had a Thai veggie add on pack last week so I bought it and was excited to make the tom kha gai. I always thought it meant coconut chicken soup, but perhaps that was simply a descriptive definition instead of literal. Apparently it means chicken galangal (blue ginger) soup. Frankly, I don't care what it means because I like it. Here is the recipe I used:

2 cans coconut milk
1 can lite coconut milk (or the water from 1 coconut...I used the coconut water)
2 cups chicken or vegetable broth
4 stalks lemongrass (remove bottom 3 inches and outer layer, bruise with knife and cut into 2 inch chunks)
5 kaffir lime leaves (leave whole) or the juice of 1-2 limes
2 inches of gingerroot, peel and slice thinly
1 shallot minced (about 3 Tbsp)
1-3 tsp sriracha (depends on preferred spice level)
1.5 pounds chicken thighs, cut into bite size pieces (do not cook first)
about 8 oz mushrooms (shitake and oyster work well)
2-3 Tbsp fish sauce
2 Tbsp brown sugar

Infuse the coconut milk: in large sauce pan pour all coconut milk (and water if used) and broth. Bring to simmer. Add ginger, lemongrass, lime leaves, shallot and 1/4 tsp hot sauce. You can put the solid ingredients in a mesh bag to make it easier to remove later. Allow this to infuse for 15 minutes.

Prep the chicken and veggies. Cut into small pieces while the broth is infusing.

Balance the flavor of the soup: taste the soup and let rest and simmer between each step. Remove the lime leaves. Add chicken. Remove lemongrass. Add mushrooms. Remove ginger. Taste. Add fish sauce and brown sugar. Taste again. Let cook at least as long as it takes for the chicken to cook (10 mins). The goal is to balance spicy, sweet, salty and sour. Add more fish sauce, hot sauce, lime juice and/or brown sugar to achieve preferred taste.

Serve with diced tomatoes, cilantro and jasmine rice.


This recipe doesn't take as long as you might think. If you're making and trying it for the first time, be prepared to taste it repeatedly. Let your taste buds guide you to the "right" combination of flavors for your family. My husband and oldest daughter are pretty mild, so I kept the sriracha low in the batch but loaded up on it in my own bowl. And as most soups, it was better the next day. mmmmmmm

Wednesday, March 13, 2013

Autographed Disney Character Postcards for Kids

The Disney brand is amazing. Sure, it's a ginormous company with thousands of branches of business, but they still take time for the little things. My daughters are huge Disney Princess fans. It started before my oldest turned 2 and has continued to this day. The princess love being passed from older sister to younger sister and even down to the day care kids. I had read that you could send a letter to Disney and you'd receive an autographed picture/postcard back in the mail. My oldest wrote a letter and drew a picture to her favorite princess of the month, Ariel. We just got a postcard back, addressed to my child, with a picture of all the princesses and their "signatures!" Needless to say, my daughter was thrilled. Such a simple act gathered a giant smile.

Here's how you can get a postcard sent to your child:

Write a letter to your favorite Disney character (it's not just princesses, you know!). Be sure to include a return address!


Send the letter to:
Walt Disney World Communications
P.O. Box 10040
Lake Buena Vista, FL 32830-0040

~OR~

Walt Disney Company
Attn: Fan Mail Department
500 South Buena Vista Street
Burbank, CA 91521

Wait about 4 weeks and your child should receive their card in the mail.


 Hope your little one enjoys this as much as mine did!

Tuesday, March 12, 2013

Huli Huli Chicken

I love reading cooking magazines. I used to subscribe to four different magazines. I'm down to just a couple these days. I always find new meals in them. Sometimes it's a full recipe, sometimes it's an inspiration to tweak an existing recipe, but there are so many ideas between those covers. Today's recipe came from one of those cooking magazines. It sounded tasty and the preparation was simple (just what every mom wants, right?). The key to this is to let it marinate for at least 8 hours. I usually make the day or night before we're going to eat it and really let it soak into the chicken. Obviously, it was a hit or I wouldn't be sharing it. Here's what you need:

 
1 cup packed brown sugar
3/4 cup ketchup
3/4 cup soy sauce
1/3 cup sherry or chicken broth
2-1/2 tsp minced fresh ginger root
1-1/2 tsp minced garlic
8 boneless skinless chicken thighs (or 4 boneless skinless chicken breasts)
 
In a large ziploc bag, mix all the ingredients except chicken.
Reserve about 1 cup of marinade and set aside.
Place chicken into bags and mush well to distribute the marinade.
Refrigerate at least 8 hours (I recommend overnight).
 
When ready to cook, heat grill to medium heat.
Oil the rack with a touch of oil to prevent sticking.
Place chicken on grill and cook 6-8 minutes on each side (or until no longer pink).
Baste occasionally with reserved marinade.
 
 
I served the chicken with some grilled pineapple and white rice. The reserved marinade also makes a great sauce for dipping and the rice. Try it out! Add a little Hawaiian into your meal plan!