Easter is right around the corner. Already. This is the time of year that just speeds by for our family. We have something planned every weekend until May. It's nuts. Despite our busy schedule, the kids and I made a fun little bunny craft. These can be Easter bunnies for those of you who celebrate Easter or they can just be giant rabbits for fun. All it takes is some construction paper, scissors, glue sticks and some markers or crayons to decorate. This is an OLD project I remembered making in 5th grade art class. Some crafts are timeless.
The first thing you need to know how to do is fold your paper in half like a hot dog or a hamburger. A hot dog fold you put the long sides together and a hamburger you put the short sides together. Got it? You need 4 pieces of construciton paper. Piece one: fold like a hamburger and cut a wide heart. Piece two: fold like a hot dog and cut a long heart. Piece three: fold like a hot dog then fold like a hot dog again and cut a long heart (this will actually make 2 long hearts). Piece four: fold like a hamburger and tear in half along the fold line. With one half, fold like a hot dog, cut a long heart and then cut the heart in half along the fold. With the second half, fold like a hamburger, cut a wide heart then cut the heart in half along the fold.
You should now have 1 wide heart, 1 long heart, 2 skinny long hearts, 2 half skinny long hearts, 2 half short wide hearts.
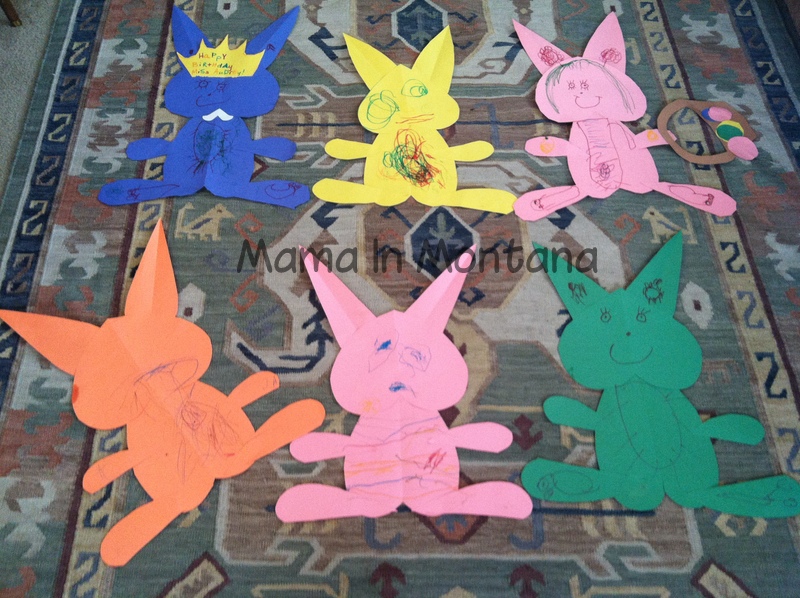
Make your bunny. Notice the placement of each heart and glue it to the other parts as shown in the picture.
Decorate to your heart's content (pun intended). This is a simple craft that beginning cutters can do. Simply trace the heart and even preschool kids can cut out the pieces. It makes a bunny that is over 2 feet tall. If you want a smaller animal, just cut 2 pieces of construction paper in half and follow the directions using half sheets. Hoppy crafting!
Showing posts with label craft. Show all posts
Friday, March 22, 2013
Sunday, March 10, 2013
St. Patrick's Day Leprechauns
I don't know about you, but my kids are holiday crazy. We actually had to celebrate Groundhog's Day. Saint Patrick's Day is a bit more fun to celebrate with two young kids. This leprechaun craft is a Mama In Montana original creation. Not inspired by Pinterest. Not recreated from an image or a blog. I prepped everything for my kids to make it easy since they're smaller, but depending on your childrens' ages, you might be able to let them do more of the work. It did take me about 30 minutes to prep 6 of these little guys, but they turned out so cute! Here's what you need:
Paper in green, black, peach, yellow
toilet paper tubes
googly eyes
cotton balls
markers
glue/glue stick
scissors
optional: glitter glue
Prep: cut a piece of green paper the height of your toilet paper tube and long enough to wrap all the way around. Mine was 5.5" square. Cut the pieces for the hat, belt, buckle, and face. I cut out of black a 2"x2" square for the hat part and a 5.5"x1" for the brim. Out of white a 2"x.5" belt. In yellow a .5" square for the buckle. For the face, I cut a 1.75" square out of the peachy color. You could do circles for the face, but I was on a speed mission.
Glue the hat pieces together as shown below.
Color the cotton ball orange with a marker.
Glue the face piece in the top center of your large green square.
Glue googly eyes on the face.
Glue the beard to the leprechaun's face.
If desired, color the rest of the face (nose, mouth).
Draw and decorate the leprechaun's body. Use glitter glue if desired. My youngest daycare kiddo had to have "sprinkles" on her leprechaun!
Wrap the green square around the tube and glue. Wrap the brim around the top of the tube. I trimmed the edge of the hats so they poked out a bit.
You can see how cute these leprechauns turned out! Each kiddo made theirs a reflection of their personality. My oldest daughter made a girl leprechaun with a bikini top and skirt. A couple kids did not want the beard. Have fun. Mix it up. Happy St. Paddy's Day!!
Friday, January 25, 2013
Holiday Craft Projects
This project was a teacher gift idea I got from a friend. It's a rather simple project using a terra cotta or clay pot painted to your color preference, glass vase glued to the upside down pot, pot base turned upside down for a lid and a knob glued on the top. Makes a pretty cute mock gumball machine, right?
This is a simple winter craft the kids made one day. You can really do it as detailed as you want. They simply painted jumbo craft sticks white and then decorated the snowmen with buttons, ribbon, markers and paper hats.
These are Christmas trees made with scrapbooking paper cut into strips. I prepped the strips by cutting them and then let the kids loose with glue sticks. Great project for all ages!
This was one project I kitted for my kids to do with Grandma and Grandpa when my husband and I went to Las Vegas. In each kit was 3 puzzle pieces, 2 googly eyes and a little heart sticker. I left some brown paint and craft glue for them to make these cute little reindeer.
Happy crafting!
Thursday, October 4, 2012
Quick and Easy Halloween Decor
If you've been reading my blog for very long, you know that I'm a big fan of quick and easy. Meals, crafts, cleaning, you name it. Today's project is right in line with those characteristics. This happens to be a Halloween project (since that's the time of year) but can be changed to any holiday or home decor. Be creative!
I've really started canning this year. My favorites are pickles and applesauce. A friend of mine gave me some quart size jars leftover from her wedding decorations that I can use for canning. I had a couple extra and thought I could come up with something decorative to use them. Here is what I used:
3 quart size canning jars
paper
glitter mod podge
dry beans
ribbon
I used a stencil to trace the letters "B-O-O" out of orange paper and then cut them out. You can cut out letters, shapes, or whatever goes with the holiday or decor theme you want. Using the mod podge, decoupage the paper to the jar.
I thought the glitter mod podge would be a festive touch, but use what you have. The great thing about mod podge is that it dries clear. Don't be afraid to use a lot to get your paper to stick to the jar. I like it uniform, so I painted the whole jar with the glitter mod podge. It made the jars all glittery and have a little texture too. Set aside and let them dry.
Once dry, fill your jars. Again, use what you have or what works for the decor. I thought black and white beans would be cute as well as easily used again. You can use candy or marbles or any small objects to fill the jars (be careful if you have little ones!).
To finish, tie some coordinating ribbon at the top of the jar.
The finished product is super cute! It was easy to make and you can have kids help along the way. I'd love to see or hear some of your creative variations. Happy Halloween!!
Thursday, August 2, 2012
Making Manners Fun!
Something very important to me as a parent is teaching my kids manners. There's no such thing as "too polite" in my book. Things like "please" and "thank you" are the foundation. I teach and we practice using phrases like "May I please...." on a daily basis. My husband and I are also working on having the kids sit at the dinner table, even if they are finished eating, until everyone is done and then asking to be excused. These are all simple things to teach my girls manners.
Thank you notes are another instance of showing manners. I want my kids to learn to be gracious for the extras in life. Birthday parties and friends are fun and birthday presents are extras. My kids are still pretty little, but it's not too early to have them help write thank you notes.
My oldest daughter just had her 4th birthday. She had a lovely party with friends and family. She's not quite old enough to write her own thank yous so I came up with this idea. Why not make the creation of the actual thank you card a craft project? She loves doing craft projects and it keeps her engaged in the process, even if she can't write the content.
I dug out a handful of my scrapbooking supplies to make the cards.
We started by using a light fibrous paper to stamp the word "thanks" a bunch of times over and over. Sorry, I didn't get a picture of the stamped page. Then I let her cut out each word.
I cut out paper to the size of 6" x 8" so when it's folded the card is 4" x 6". My daughter glued "thanks" to the front of each card.
Her birthday party theme was My Little Pony, so she stuck a couple MLP stickers to the fronts of each card.
She wanted to make them fancy, so we worked together to put some Prima paper flowers on each card using a brad.
Once the cards were done, I wrote the thank you note based on what she dictated to me. At the end, she wrote her name at the bottom of each card.
This was a very simple craft project to do with only a couple adult assistance steps. You can make it even easier by using index cards and stickers for younger kids. Having my daughter help in the thank you process helps her learn manners and graciousness. Sometimes the journey is just as important as the final product!!
Wednesday, June 27, 2012
Easy Wreath from Scraps
I love decorating for holidays. I'm sure it's because of my mother. She had at least one tote full of decorations for every holiday and season. I'm slowly building my collection of holiday decor. Fortunately, I have Pinterest to help me create my own decorations.
I've seen some cute wreath ideas on Pinterest. I pin them, but because LIFE happens, I rarely make a list of the supplies I need to create a specific wreath. Fortunately, I know how to improvise. Today's tutorial is my version of several different wreaths. Let's just call it a craft mash-up. :) All I used was a wire hanger, fabric scraps and tulle.
First, I cut red, white and blue fabric into 1" x 6" strips. The size doesn't really matter. I used my rotary cutter, but you could cut individually using pinking shears too. I went for quick and easy and hoping they'd start to fray. Like any good quilter, I had quite an assortment of red, white and blue fabric scraps. Jumble your strips into one big pile so your wreath has a random look as you're creating it.
Take your wire hanger and bend it into a circle shape. I used the bottom of a 5-gallon bucket to help shape mine. It wasn't a perfect circle but it will do. Then tie each strip to the hanger. Make a simple square knot with the strip. As you tie, it will start to fray the fabric. Continue until the entire circle is covered in fabric. You'll want to scrunch the ties close together to cover the hanger and make the wreath more full.
When I finished, I thought it needed a little something more. I decided to add some tulle to the wreath too. I cut strips that were 8" long. I did the red first and cut them 3" wide but decided that I wanted them a little poofier, so the other colors were 6" wide. I simply tied the tulle strips on the hanger between the existing fabric strips.
I think it turned out very cute. The hanger part makes it easy to hang on a nail. You could get fancy and use wire cutters to snip the hanger part off and loop a large ribbon around the wreath if you wanted. Work with what you have. The fun part about this project is you can change the colors and make one for any holiday! Have fun!
Friday, April 20, 2012
Recycle, Reuse, Reduce!
Earth Day is this weekend. I hope each of you has something in mind to reduce your own carbon footprint and give back to Mother Earth (and not just on Earth Day). Our family tries to do our part as well. I absolutely love that my kids not only help with recycling but argue over who gets to put something in the bin. Many of the craft projects I do use items that are recycled or repurposed. The cool term is "upcycling."
One of my favorite things to upcycle is toilet paper rolls. We've used them in Christmas trees, turkeys, monsters, binoculars, and today I'm going to show you how to upcycle into bird feeders. Thanks to my friend Mandi for the idea for this craft. It's a variation of the pine cone feeders, but using products from the home. Please note, there is peanut butter in this craft which may not be an option for all kids because of allergies. Here is what you need:
Start by putting a giant glob of peanut butter on a plate. I gave each kiddo a plate and a plastic knife and a roll. Showed them how to spread it on the roll and let them go. One of the kids ate more peanut butter than she put on the roll. No biggie. Cover the entire tube in peanut butter.
Then, put some birdseed on a plate and roll the peanut butter covered tube in the birdseed. Sprinkle on the seeds to cover all the PB.
At this point you can put the tube back on its base (if you have one) and be done. Otherwise, you can thread yarn or pipe cleaners through the holes punched at the top for the feeder to be hung. Easy peasy, right? The kids loved this and we hung one of my girls' feeders out right away. There's not a lot of variety of birds here in Montana, but we already have a bird house feeder in our back yard, so the finches and robins know where to come for a snack. One of the great things about this craft is once the birds eat all the seeds, you can toss the tube into the recycle bin. Happy Earth Day everyone! Recycle, reuse, reduce!
Thursday, April 19, 2012
It's my 6th month birthday!
Wow! I can't believe it's been 6 months since I started this blog! It was a work in progress before the first post and it continues to evolve every week. As with most of my friends who keep a blog, I wish I was able to post more frequently. Some of my posts have been quite popular, others less so. I'm learning what works best for reading material by what is read and/or shared on Pinterest.
My original plans for content have changed. I thought I would share mostly crafts I did with my kiddos with other things added from time to time. I've found that although I love the kids crafts, it's not nearly enough to fill a blog. I'm always searching for new recipes to try on my family and share with you. I'm forever grateful to Pinterest to help inspire crafts, recipes or home projects.
As always, I have plans for a few posts in my head that I need to refine and write. I'm happy to take suggestions from my readers on potential posts, crafts, recipes, whatever! I've been a guest blogger on Strive for Progress and Mae has guest posted here. My friend Marj from go-Go-GROW! will be posting in the future as well. If any of you are interested in guest posting, please let me know.
My goal is to build my readership (is that a word??). I've started a corresponding Facebook page for Mama in Montana so please become a fan. I would appreciate sharing my page and my blog with your friends. And continue to Pin what you like for Pinterest. If you're a reader, please consider becoming a follower. You have and will see some visual changes to the blog, too. I was lucky to have access to every design program at my last job and now my designing is limited to Picasa. I'm learning what I can and can't do in there and hopefully I'll be able to do a few more things with the images. I'm no professional photographer, so you'll have to bear with me on that aspect. :)
If you are a blog writer and a reader, I'd love to help promote your page if you'll help me promote mine. Just post a comment and we'll get in touch.
Thanks again for taking the time to read my posts. This blog is something fun for me (which is why I'm ok with not posting daily). I'd love to expand my readers, but knowing there's folks out there who might check out something we do in our home makes me smile.
Monday, March 19, 2012
St. Patrick's Craft Day
I've been a crafter for as long as I can remember. I absolutely love creating projects for myself and my kids. This is another reason why Pinterest has become such a phenomenon for me. I love the ideas I see and can't wait to try them out. I had seen a couple different St. Patrick's Day projects for kids that I wanted to make. I thought I'd try something different though, I hosted a big craft day at my house for my mom friends and their kids. All in all, we had 15 kids and 7 moms making 3 different craft projects! When the crafting was all done, I had a rainbow of fruit and snacks for the kids to eat.
The set up wasn't bad at all. I purchased all the supplies and did a demo project of each of the three crafts with my oldest daughter. This way each table could see a finished project and I wouldn't have to "lead" the craft. I set up multiple tables and the supplies needed for that craft at the table. I don't have a huge house, but it worked out well having the craft stations. In fact, I'll attempt to do this again come summer time. I'm thinking giant bubbles and homemade sidewalk chalk or paint. We'll see. Anyway, here are the pictures from our craft day. Hope you enjoy them and take some ideas for your own craft day or projects next year!!
The set up
Rainbow of fruit and marshmallow "clouds" and Rolo "gold"
Subscribe to:
Posts (Atom)